Wednesday, September 21, 2011

Cooking Party Invitations : It's TIME to Celebrate!


My sis and I had so much fun making Monkey's cooking party invitations!  Well, I had so much fun.  Guess I can't speak for my sister...

I love to make my own invites to save budget money for fun things like the kitchen timer we attached to each invite.


I fell in love with these timers from World Market back in the spring when I first spotted them, and I have been watching for them to go on sale.  They finally did, and I was able to snag them for $1.50 apiece!  See, it pays to plan ahead!

We found 4 different types of timers (pear, carrot, strawberry, and lettuce), so I wanted to incorporate those words into the invite.  This is what we came up with:

It's TIME to celebrate
Monkey's 7th Birthday
LETTUCE bake up a BERRY good time
Join us
(date)
(time)
Wear something you won't CARROT all about getting messy
Take a PEAR of cupcakes for your siblings at home

I often get the sibling question, "How do you handle whether or not to invite siblings?"  I find it hard to leave out siblings with our close friends, because we are also close to the siblings.  However, for this party, I gave Monkey a 10 child limitation (crucial for a cooking party, IMHO).  But...I felt kinda bad about having to exclude siblings, so I decided that we would send home cupcakes for them.  As a side note, since we tend to have parties at home (which are smaller and more intimate), we usually have a park and cupcake play date on our girls' actual birthdays and we invite everyone in the class, siblings and all.  That's definitely a "more the merrier" occasion.

When it comes to school friends, I feel it is perfectly fine to only invite the friend and gracefully ask for siblings to stay home ("Due to space limitations, we cannot accommodate siblings this time.  Thank you for understanding").  I have a friend who has decided not to attend anymore parties unless both her girls are invited, because it leads to hurt feelings.  I can see both sides of the issue, and it's definitely tricky, but I feel like I can make a party more special if it is a smaller group of kids.

What do you think?


Monday, September 19, 2011

Make sure your next party flows seamlessly: Create a timeline


This is a snap shot of part of the timeline for Monkey's cooking party.  I wrote the time, activity, and the room we will be using.  Having a visual timeline helps me to make sure the party will flow from one area to another and will ease in setting up for the party.

Below that information, in blue, I added the things that will need to be set up for the activity.  This way, I can quickly look and see what I need to do to prep for each activity.

Even if you don't follow your timeline exactly during your party, just having an idea of what you want to do and when will help.

Note:  This is not an activity to do the night before the party, or even the week of the party.  This timeline was written 2 months before the cooking party, during the brainstorming phase of planning. Brainstorming is much easier when there is no impending deadline.  See my timeline suggestions here.

Tuesday, September 13, 2011

Time to Think About Halloween Costumes!


Why not organize a costume swap?

Check out this great site for details!

Or, if you want to buy your own, check out hip2save for this costume deal.

Happy hunting!

Wednesday, September 7, 2011

WEEK THREE: Brainstorm Your Guest List and Choose Your Theme

Print this guest list at top party ideas

This week's 15 minutes includes finalizing your theme and brainstorming your guest list.  It's an easy-breezy week, if you did your homework.  If you haven't gotten around to brainstorming your party theme, do that first.  Once you've brainstormed possible themes, and mulled the possibilities over for a few days, pick the one that most speaks to you.  The more excited you are about your theme, the easier the planning will be- and the more FUN.

Once you've chosen your theme, grab a piece of paper or print out a guest list template and fill it out.  If the one above doesn't strike your fancy, a simple google search of "party guest list" will bring up several images that you can click on and download for free.  You could create your own, but try not to get bogged down in the perfection of what your guest list looks like.  I quickly scribble mine in my party planning journal and it looks like this:


I simply erase or strikethrough my list as guests RSVP.

You're just brainstorming your list this week- you will finalize it in a couple of weeks after you've had time to reflect on the size of party you want to throw and which names you want to add or delete.  So, set your timer for 15 minutes and try to beat the clock as you create your guest list.

Have fun!


Want to start from the beginning?  Here's what we've done so far:

Friday, September 2, 2011

Don't forget to leave yourself breathing room in deadlines!


I am making something for some very special people for a very special occasion.  The occasion isn't for a few more weeks, but I decided I wanted to finish this project by this Thursday, so I could take it to them when I see them this weekend.

But..life stepped in and put the kibosh on that.

While working on my french memo board Monday night, I realized that I did not have enough ribbon to finish my project!  I went to JoAnn's on Tuesday morning to buy more, only to find that they didn't have enough in stock.

This has been such a powerful reminder to me to always leave breathing room for the unexpected.  Though I may not meet my Thursday deadline, I still have plenty of time to complete the project for the big day.

So, my advice to you is: Don't wait until the last minute to start your projects.  You never know when you will have a sick child, run out of supplies, have a work crisis, etc.  Giving yourself a self-imposed, early deadline will help to ensure you have plenty of time to meet the REAL deadline!

Wednesday, August 31, 2011

WEEK TWO: Brainstorming Party Themes

Last week, I encouraged you to choose an upcoming party you plan to host and follow me as I show you how to plan it in 15 minutes a week.  Read more about that here.

So, I am assuming you did your "homework" and have chosen the party you will be hosting.  You should also have your planning book (anything you can doodle in will do!).

Once you know what party you are hosting, the next step is to brainstorm a theme for your party.  Not all parties have a theme?  I disagree.  All memorable parties have a theme of some sort- though the guests may not know exactly what it is.  Great events stem from an inspiration- it may be a color palette, a character, a book, an era...the possibilities are endless!

If you still don't have any idea what type of theme you want, think of the GOH (guest of honor) for the occasion.  If it's a birthday party, think of the interests of the GOH.  If it's your birthday, it should be easy to think of what you like!  Even if you're planning your Thanksgiving party, it's fun to have a theme in mind.  It could be a certain color scheme, or a favorite thankfulness phrase.

Still stumped:  Read Party Themes 101-another post on brainstorming themes.  If you like that, here's Brainstorming Part 2.

Ok, now that you have your theme in mind, the fun begins!  I love to do mind mapping or webbing for my brainstorming.  Sometimes I just doodle all my possible ideas for a party, like this:


The idea of brainstorming your theme is to get your creative juices flowing.  Remember in grade school when your teacher taught you to brainstorm and she wanted as many ideas as possible, the crazier the better?  Ideas beget ideas- and that next idea may be the golden one!  So go crazy on paper and brainstorm as many ideas as you can.  In 15 minutes.  Then put it away for another day.


So, your homework for the next 7 days is:

  • Choose the date/time of your party
  • Brainstorm ideas for your party with a web, a list, some doodles- whatever floats your boat!
Extra Credit:  If you're type-A like me, and you want a long term vision for where this is going, go ahead and create your party planning timeline.  Once you have your party date, count back 4 weeks.  That's the date that goes next to "Send out invitations."  Then you just fill in the rest of the timeline with dates, one week for each step.  You can copy my timeline here or copy my online timeline here.

Want to start from the beginning?  Here's what we've done so far:


Wednesday, August 24, 2011

WEEK ONE: Sit down for 15 minutes this week and plan your next party


Raise your hand if you promised you wouldn't let your next party sneak up on you.  


Were you able to keep that promise to yourself? If so, congratulations- I bet your party rocked!  


If you were not quite successful, and you ended up stressed and running around like a headless chicken (poor chickens!), don't despair. 


Focus on now and let's plan a party that will not sneak up on you.  From start to finish, I'm going to walk you through your next party...15 minutes at a time!  Seriously. So, choose the party you are going to work on and get ready to have some fun!


Even if you don't have any parties coming up, just choose your next one.  It may be your child's party that is 6 months away.  Or maybe you want to plan your Thanksgiving holiday.  Maybe you want to plan a school holiday party.  It doesn't matter.  This is about learning the process of planning ahead.  So just choose a party you'd like to throw in the relatively near future and let's get to it!  We will be doing 15 minutes a week, every Wednesday, so it's better if your party is at least 3 months away.  I know that sounds crazy, but once you see how easy it is to plan in advance, you'll see the method to my madness!


All you need to start is a journal to take some notes in.  


DON'T GO BUY ONE!  


Just grab something you have lying around- could be a spiral, a journal you started but only wrote a few pages in (tear the pages out and it's new!), or even a legal pad.  If you have a journal you want to make party-plan-a-licious, check out this link for inspiration.


I'll see you here next Wednesday to start planning our next party!  


To recap, your homework for the next 7 days is this:

  • Choose what party you'll be planning (you don't need a theme, just an occasion- birthday, anniversary, holiday, etc.)
  • Find a notebook to keep your planning notes in
If you're feeling adventurous, tell us what party you will be working on.  I will try to incorporate your needs into blog topics to help you with your planning.

Monday, August 22, 2011

Give Yourself a Week To Gather Your Party Favor Supplies


Do you like to make your own party favors?  If so, do yourself a favor and pencil in at least a week to gather the supplies.  I give my self three weeks to do favors for a party: one week to gather and two weeks to make them.

When my timeline says "Plan favors," I create something similar to the photo above.  I've already brainstormed the favors by this point, so I know what I want to do/make.  During the planning stage, I make a list of the favors, a list of what I need to gather and/or buy, and a list of the things I need to make.  This only takes 15 minutes but it saves me so much time as the party draws near!  

I do this well before it's time for me to actually make the favors.  In fact, I "plan favors" four weeks before I actually start making them.

"Why in the world do you do that?" you ask.  It's simple.

When there is an impending deadline of completing a task like favors for a party, I find my mind starts to race and feel like it's already behind.  By planning everything out when the party is still weeks away, I allow my mind to relax and focus. I give it time to ponder exactly what I want to do, without worrying about whether or not I actually have time to do it.

In my opinion, this is the key to throwing a great party without having to say, "THIS would be such a cool thing to do, but I just don't have the time."  By planning well in advance what it is you actually want to do, you have an idea of how long it will take you and how much time you need to give yourself to create your masterpiece.

Once I have made my lists, I continue to follow my timeline and work on other aspects of the party until 4 weeks later when it's time to start gathering my favor supplies.

Since I've know for a month what it is that I want to do/make, it's quite possible that I have found most of the supplies during regular shopping trips (often on sale!) and I don't have much to gather.  But if not, I have a week to gather them.

Amazon prime is quickly becoming my shopping method of choice for things like this.  You cannot beat free 2-day shipping to your door!  If it's something I can't get on amazon, I will sometimes take the four weeks to visit Hobby Lobby or Michael's and use a 50% off coupon.  This is a luxury you have when you plan ahead, since you can usually only use the coupons on one item and will likely need several supplies for your favors.

During the next two weeks I work on making the favors.  It doesn't usually take me anywhere near two weeks- usually only 1-2 nights with my partner in crime (aka my sister) helping.  But having two weeks keeps me from feeling under the gun and makes the whole planning process more FUN for me.


And enjoying the party planning process is my goal for any party I throw.  While studying happiness for her Happiness Project, Gretchen Rubin found that we tend to feel happier when we relish in the anticipation leading up to an event and that we often enjoy the anticipation more than the event itself.

I find that to be true with party planning as well.  When hosting a party, you are often pulled in several directions and fluttering around to make sure all runs smoothly.  Why not enjoy the planning and make yourself happier?

When is your next party?  What can you do for 15 minutes this week to make it a HIT and a BLAST to plan?  Check out my 12 week timeline  or the online timeline I created and start planning!

Monday, August 15, 2011

Use this great interactive FREE project website for your next party


Want a new way to organize your to do list?  Have you tried scrumy?  It's a free website (you can pay for upgraded features) that helps you organize any project.

I love that you can drag and drop tasks as you start and complete them.  I also love that you can work with other people on the same project and each team member can update the tasks in real time.

I'm sure there are much more advanced programs that do the same thing in a flashier way, but this is really easy to use- sometimes less is more!  And it's F-R-E-E, which I love.

Of course, I have been using scrumy to keep track of my party planning.  Here's a timeline I made for you to play around with.  Have fun!

Thursday, April 14, 2011

It's Tea Time: A Delightful Tea Party Fit For Any Princess


Tea parties are always so much fun, and pretty easy to pull off with flair.  A friend is planning a tea party for her daughter's 4th birthday and I have had a blast helping her come up with ideas.

She found an adorable assortment of hats for the girls to adorn themselves with upon arrival.  Feather boas would be a fun addition too. Girls of this age love to dress up, and anything fancy will work for a tea party!


Decor is easy- anything pink or pastel will create a magical tea time.  A borrowed pink cloth table cloth and napkins help to add a grown-up feel to this playful party, which makes the party all the more fun for the little ones.  They love dressing up and "being grown-up."

An assortment of tea cups and saucers will also add whimsy.  A quick google search found the above assortment on goodwill.com.  Several mixed sugar and creamer sets, placed strategically on the table will allow the girls to practice serving themselves without having to reach too far around the table.  You could search thrift stores and garage sales, but for something like this I would probably borrow from friends.  Don't we all have a set that came with our wedding china?

You could also borrow the tea cups, but I think it would be fun to send each child home with their teacup as a party favor.


Tea food is so much fun.  Strawberries and cream are easy to do ahead (whip the cream within 30 minutes of the party and keep in a chilled bowl in the fridge) and are so elegant but also kid-friendly. Strawberries are on The DIRTY DOZEN list, so I really think it's worth buying organic ones.

Cucumber and cream cheese (or toffuti for those who are dairy-free) sandwiches are a must-have.  Cut off the crusts and cut into shapes and a regular old sandwich becomes extra fancy!  Fluffernutter sandwiches would also be a fun treat.

Scones and lemon curd are a tea time staple and are easy to make ahead.

The only other thing needed for a traditional tea is petit fours.  These dainty little cakes are absolutely delectable and gorgeous, but IMHO are labor intensive and time-consuming.  I would definitely purchase these from your favorite bakery.


For a craft, I love the idea of making a tea tray to carry their tea cups and saucers home on!  IHeartorganizing has a quick and easy tutorial for this.

I would pre-paint the "found" frames, but an assortment of scrapbook paper to size, and let the girls choose their paper to complete their tray.  You could even let them decorate the paper with stickers or crayons before putting it inside the frame.  If you have access to a photo printer, a tea-time print of each child would make this a keepsake of the event.

You could also use the tea cups or the tray for the invitation, but I like the idea of a little tea tin filled with an assortment of teas.  You could personalize each one and put the invitation details right on the tin. I love the idea of giving guests something that will create PARTY BUZZ.  Being able to sample different teas and seeing the invitation on the tin is sure to get the kiddos excited each time they brew a bag.

And as for the TEA, for little ones, I like to use Celestial Seasonings Fruit Teas.  They are easy to find, cost effective and the fruit teas are caffeine free.  If you buy the sampler on amazon, you can use a few to stuff each tea tin and still have plenty left for the party at the tea.  Gather a few different tea pots and brew an assortment of teas for the kids to enjoy.  For children, I like to put an ice cube in each cup and pour the hot tea over it.  This quickly cools the tea, but without a splash.


I think it's always a good idea to have a play area set up.  For this party, it might be fun to borrow 2-3 kid sized tables and stage a bear tea party at them in an open play area.  You could borrow some plastic tea sets and "set" the table for the party.  The children can play tea party while you set up for each activity.

I cannot wait to attend this party!  Now I'm off to brew some tea...

Wednesday, April 13, 2011

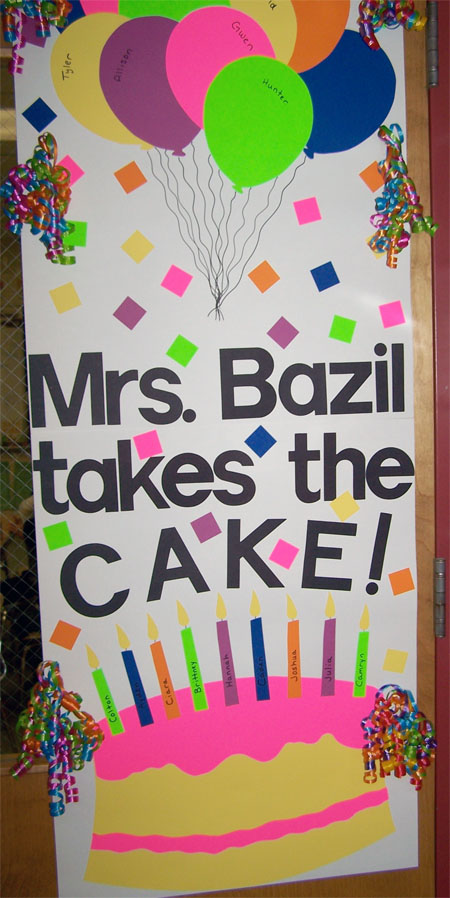
Wrap your teacher's door!

Maybe it's because I miss toilet-papering houses, or maybe it's because I miss decorating bulletin boards (no, that can't be it!)...but I LOVE the idea of wrapping a door.

Skip to my Lou has some great ideas for wrapping your teacher's door for Teacher Appreciation week.


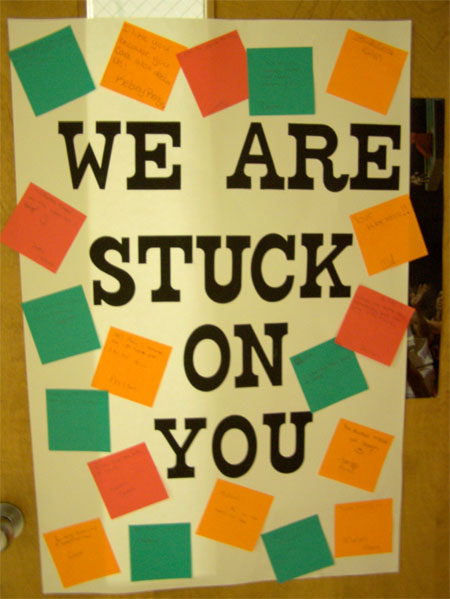
I definitely plan to do this for Monkey's teacher.  I will visit the class the week before and have each student write a note to the teacher on a post-it.  Then early Monday morning, I will "wrap" the teacher's door.  I chose the "We're Stuck on You" one because 1) It's quick and easy and 2) If the teachers wants a keepsake from the door, she can keep the individual post-it notes.

If you want to do this too, go ahead and add the dates to your calendar now so it doesn't sneak up on you (I also like to have an email reminder sent from the calendar the week of, as a reminder):


  • Buy chart paper (you might be able to get some from the PTA) and post-its **before or on April 29th
  • Die cut any letters (you can probably use the teacher workroom)  **before or on April 29th
  • Visit your child's class and let children write notes on post-its  **April 29th  
  • Arrive at school early to "wrap" the door **May 2nd


If you don't have a teacher to "wrap," this would also be a super fun birthday tradition.  For my husband's 21st birthday (we were dating then), I wrapped the inside of the front door.  It was lots of fun to make, and it was a great conversation starter for the party that night.

Forget the toilet paper, grab some chart paper and start WRAPPING!

Monday, April 11, 2011

FREE Personalized Mother's Day Gifts...ACT FAST!


Until April 13th, Snapfish has a BUY 1, GET 2 FREE photo mug offer.  That's one for you, and two for each of the grandmothers for Mother's Day.  Act fast- it's only good for 2 more days.  Use Code: 11MUGS.

Spring Has Sprung!

Keep on track with this adorable carrot kitchen timer available at World Market!  Only 2.99!

Cute basket stuffer or spring party favor that won't break the bank.  And useful:  "Mommy, has it been 5 minutes yet??"

Friday, April 8, 2011

Time to think about TEACHER APPRECIATION!

This year, teacher appreciation week is May 2-6th.  When I taught, I LOVED this week.  My favorite part was the luncheon each year- put on by the PTA.  So yummy!  Not sure I can pull a luncheon together this year, since it's right around the corner.

But that doesn't mean I can't pull off something spectacular.

The big challenge with something like this is that I want to accomplish 2 goals:

1) I want to spoil Monkey's teacher to show her how much we love her

2) I want to enable ALL the students in Monkey's class to spoil the teacher.  I always felt sorry for those kiddos that showed up empty handed when other kids brought gifts.  Not because I cared about the gifts, but because they wanted a way to show their appreciation too and weren't able for whatever reason.

So...I'm thinking a week's worth of little surprises for the teacher, to be brought in by whichever students can participate.  I want most of these surprises to be things that can be easily acquired, so parents don't have to scramble.

Something like this...

Dear Parents,

Teacher Appreciation Week is May 2-6 this year.  I know we all want to show Mrs. _____ how much we love her!  Let's shower her with gifts each day next week:

Monday:  Please send a handwritten note from you or your child letting Mrs. ____ how much we appreciate her.

Tuesday:  Please send a pencil or other writing utensil to school with your child to show Mrs. ____ we think she has the WRITE stuff.

Wednesday:  Please send 1 piece of candy or small treat to school with your child to show Mrs. ____ how SWEET we think she is.

Thursday:  Please send a small snack (nuts, trail mix, etc.) to school with your child to show Mrs. ____ we are NUTS about her.

Friday:  Please send 1 dollar to school.  The students will present an Itunes gift card to Mrs. _____ to show her we think she ROCKS.

I will also be decorating her door early Monday morning of that week (so she can enjoy it all week)...more on that to come.

If you want to do this along with me, here's the to do list:


  • Write the letter (or just cut and paste the one above)
  • Have it translated
  • Make copies and seal; send to school for teacher to send home
  • Decorate a basket for the kids to put the gifts in
  • Make small signs for each day (Mrs.  ____, you have the WRITE stuff!)
  • Buy the Itunes gift card
  • Visit the class the Friday before to remind students about the plan and to answer any questions
Easy-peasy, but with a BIG IMPACT, and a way for every student to participate. 

Stay tuned for door-wrapping ideas for your teacher too!

Thursday, April 7, 2011

Integrate Word Play into your Egg Hunt!

Last night, my sister and I headed to Target to gather egg stuffing supplies.  If you haven't gotten yours, it's time to start thinking about it.

Technically, we are apparently boycotting Target.  I don't know if I can handle another boycott.  I mean, a girl's gotta shop!  We knew we weren't going to Wal-Mart.  I mentioned the Dollar Store, but Sara quickly shot that down.  Apparently, there is lead in their candy??  Geez...who knew.  To be fair, this morning, I couldn't find a thing on lead in candy from the Dollar Store...but I did find this interesting article about what not to buy at the Dollar Store.

We finally decided Target was the lesser of all the evils of cheap shopping.  But, in order to maintain our dignity, we decided to pretend to be lesbians in solidarity to our gay friends.  Of course, once we got there, we forgot all about that.  Sorry, friends...

Anyway...........while we were there, we (ok, it was Sara!) had a stroke of genius.  We were in the toy dept searching for a puzzle to use for stuffing our family hunt eggs and Sara picked up Bananagrams.  The idea is to put some letters in the eggs and have the kiddos use the letters to form words, which they will turn in for a treat or prize.  BRILLIANT!  We decided to save that idea for next year when Squeaker can participate.  But if you have older kiddos...

Monday, April 4, 2011

Time to get those EGG supplies!


Believe it or not, Easter is around the corner.  As are all those hunts...you know, for school, for your MOMS club, for your own egg hunt....the list goes on.

I don't like getting caught at the last minute, and I like to stuff them all at once, so first I make a list of all the eggs I need to stuff:

  1. 12 for Squeaker's school
  2. 19 for Monkey's classmates
  3. 24 for Spring Fling
  4. 24 for Easter morning hunt at home
So...basically, I need to have 79 eggs, ~7 dozen.  I keep eggs from year to year, so I need to check my stash and see how many I have and how many I will need to buy.  I want to give myself plenty of time to buy and stuff, so I'm not up late the night before...so it's time to look at my calendar.  

Especially when planning ahead and putting dates on my calendar, I like to give myself a week to complete a task.  I don't know right now what I will be doing 3 weeks from now, but I can usually carve out the time to complete a task in any given week.

Our first hunt is on the 20th, so I will want to have everything ready by that Monday (the 18th).  Which means I will want to have my supplies by the 11th, which means I need to check my stash within the next few days so I can get to the store and buy whatever supplies I need.  All these dates go on my google calendar, with reminders set.  This only takes a few minutes and frees up mental clutter for me since I won't have to worry about when and what I need to do to prepare.  If you're like me, it's not the actual task that bogs me down- rather the incessant feeling that I am behind or that I have forgotten something.

Ok, so now that I have my reminders set, I am free to get to the fun stuff- brainstorming non-candy egg fillers.  Here's what I've come up with so far:

  • stickers
  • stampers
  • bath confetti
  • jacks
  • Legos
  • temporary tattoos
  • quarters
  • character bandaids
  • small erasers
  • rings, necklaces
Do you have any ideas for non-candy egg fillers?

Wednesday, March 30, 2011

Spring Fling

I beamed when Monkey recently asked me, "Mommy, what's the deal with our spring fling this year?"  I relished holiday traditions as a child and prioritize creating healthy ones with my own family.

I love that the Spring Fling 
has become a tradition to my oldest!

This tradition started for Monkey's second Easter.  We had recently moved from Dallas, and some friends brought their toddler down for the weekend for an egg hunt.  It was so much fun to have another family to egg hunt with (especially since we only had one kiddo in our family at that time) that when they couldn't make it the next year, I decided to host one for my MOMS club.  Four years later, we are still hosting a spring fling, though the guest list has evolved.  I find that as our families grow, we can accommodate fewer families at one time.  What a wonderful problem to have!

Here's how to put together your own Spring Fling, with very little effort and time, resulting in cherished memories

  1. Choose a date/time- We usually have an afternoon hunt, followed by a potluck dinner.  I love this time for parties right now.  It allows for playtime with friends (outside while the weather is awesome), dinner, and then BED for the kids.  Having my kiddos go straight to bed-or soon after-a party eases my clean-up.  I can quickly tidy-up while Daddy is doing bedtime routine (or vice-versa) and then the adults can relax and visit without having to dread an impending mess.  This is especially helpful if you have guests staying with you.  While your guests are getting settled for the evening, you can straighten up and be ready to resume entertaining.
  2. Invite guests- For this type of party, you really don't need a formal paper invite.  Go easy on your budget and the trees and send an email or evite.  With my friends, I like to send out an email.  I usually send out a quick save the date early on and then follow up with details later.
  3. Plan the activities/make to do list- We usually have the egg hunt as soon as everyone arrives, feed the kiddos, and then have a relaxing dinner over conversation while the kids continue to play.  My timeline and to do list look something like this:
5:00pm  Guests start arriving.  Potluck dishes are arranged in the kitchen, while the kids play in the playroom. (The backyard is usually off limits because the eggs have been pre-hidden).

5:20  As soon as all the guests have arrived, the kids are let loose in the backyard to find their 12 eggs.  I usually ask guests to drop off 12 stuffed eggs, per child, the day before the hunt.  Each child goes home with 12 eggs.  This makes hosting so much easier for me (I already have to stuff a ton-o-eggs for my neighborhood hunt), and the kids love the variety that comes in the eggs.  I feel fine asking this small group of friends to contribute this way, but I'm not sure I'd do this for a bigger group of acquaintances.  Of course, our rule is to stuff with something other than candy.  If your child is very young, and counting to 12 is tricky, you could give them a clean, empty egg carton to fill.  When each slot is full, they have their 12 eggs!

5:40  Feed the children.  I love feeding them outside.  This is one of the few occasions I use disposable dinnerware.  I love this compostable type.  You can often find it on sale, but I like to get it wholesale from my local Frontier co-op.

6:00 The adults sit down and eat.  Woo hoo!  Of course, we've all been munching the entire time.


6:30  Let them eat CAKE.  I love that my group is not sweets centered.  We are all cognizant of the effect of sugar on little ones (and ourselves!) so when I ask everyone to bring a dish, I know it will be a whole food item.  This year, my family is providing the main dish (a brisket) and the guests are asked to bring a side.  In my circle, side dishes are not code words for heavy starches but for VEGGIES and FRUITS.  Ah, I love my friends!  If you want to try to ease your way into a more nutritious potluck (this didn't happen for any of us overnight, try making a sign up list for the potluck that lists: protein, vegetable, grain, or fruit).  It is a party, so I think one sweet is NECESSARY!  This year I am making cupcakes.  I like to make my own because I can control the ingredients.  Squeaker has a sensitivity to wheat, so I make mine with brown rice flour.   Because this party is late in the day, I also plan to sneak in a little protein powder and walnuts-which will help counteract the sugar.  Dr. Sears states:  Adding protein to a high- sugar meal mellows out the behavioral and learning deterioration. 


I plan to make flower cupcakes, similar to the ones in the top left corner of the picture above.  I adore these Vitamin C Lolipops and plan to use them as the flowers.  I buy these in bulk from a co-op so I can have them on hand for those times when I have to send a treat to school (parties, etc.).  I love that they use natural dyes and have vitamin C in them!


7:00 Goodbyes and Bedtime


Easy peasy and super fun!  


To Do List:

  • Invite guests; mention the 12 stuffed eggs per child
  • Stuff 24 eggs for my kiddos
  • Put out Spring decor
  • Straighten house
  • Make cupcakes
  • Make brisket
  • Buy mini-water bottles and adult beverages
  • Make spring water bottle labels for kids
  • Clear space for potluck dishes, and set out extra serving pieces
  • Set the kiddie table with Spring decor
  • Buy potted flowers for decor
  • Power wash house (what a great excuse and deadline to get it done!) and mulch flower beds
What are your Spring traditions?

Monday, March 28, 2011

How about a BARBIE Fashion Fairytale Party?


My friend Kari just threw the most adorable party for her 5 year old little girl.


When she asked the bday girl what she wanted to do for her birthday, the answer was 
FASHION FAIRYTALE!!
Not being very into Barbie these days, I had no idea what she was talking about.  Luckily, every girl knows how to have a fashion show!  I had so much time brainstorming this party with Kari.  

She and her husband Mark made this a party her little one will never forget!  Every detail was perfect and the birthday girl relished in it all.

Here's the scoop on how it went down:

DECOR:


Mark made a real, red-carpeted runway for the kiddos to walk down and model their fashions.  


He also attached a disco ball to the ceiling that was a huge hit with the kids.  They loved dancing in the "falling sparkles."  A disco ball is a FABULOUS investment!  I bought mine at a resale shop, with a bag of strobe lights included, and have used it for dance, 90210, and Michael Jackson parties.  They are such an easy way to add festivity to any theme.  Keep you eye out for one (unless you are a friend of mine IRL, because I love to share!) and snatch it up if you see one.


Mark and Kari also made a curtain out of  plastic tablecloths that served to separate the runway from the dressing room.  They hung them on pvc pipe that hung from ceiling hooks.  


Which leads us to the action spot.  On the other side of the curtains, every little girl's fantasy came true (the two little boys there seemed to be enthralled as well).  Kari used a clothes rod that she had on hand.  She took the extenders out and, voilà! a kids sized rod held all the dress up clothes perfectly!  We used a coffee table, end tables, and trunks to display all the accessories.  There were tiaras, tons of beads (leftover from MARDI GRAS), hats, purses, feather boas, and shoes lined against the wall.  The kids couldn't wait to dive in and start dressing.


Timeline:

11:00 am 

The kiddos arrived and decorated sashes (we used 3" ribbon) with fabric markers.  We had glued them the night before and the glue wasn't dry, so we ended up stapling them which worked fine.  The fabric markers didn't show up very well on the ribbons, but the kids didn't seem to notice.  They decorated to their heart's content.  If you decide to do sashes, I would suggest using chart paper and washable markers or ribbon and glitter paint pens (this will be messy and probably won't dry quickly but would be very fancy!).

11:15

The kids dressed up and had makeup done.  The makeup was a very subtle pink blush, put on with cotton swabs and a pink lip gloss put on with fingers or qtips.  Even though the makeup was almost invisible, the kids got a hug kick out of it!  Win/Win in my book!  I love stations at parties.  If you have stations, like a make up station, or a decorate your own stash station, it's very helpful to ask a friend or relative beforehand to man that station.  When you are hosting, I find it's not very practical to expect to be able to oversee an activity.  It works better for me to have people (thanks Sara and Bridget!!) that will do that for you, so you can mingle and play hostess.

11:30

The kids strutted and twirled down the runway to a special playlist Kari created, including Katy Perry's "Firecracker" and Ru Paul's "I Want To Be A Super Model."  It was so cute to watch how much fun they had.  Kari and Mark had a karaoke machine hooked up to the TV, so the runway was also viewable on the TV and the kids loved watching themselves.  Kari used the mic to introduce each model.

11:45

Most kids wandered into the playroom for some free play while we cleaned the leftover accessories off the tables and set up for pizza.  Then it was PIZZA time.

12:00

The kiddos drifted back for some more free play while we cleared the tables again in prep for cake.  We have such a great group of friends who all helped clear and keep an eye on the kiddos.  I hope you have these types of friends at all your parties!  If no one offers, don't be afraid to ask someone to clear the plates and cups as kiddos finish.  I find that guests are often eager to help, especially moms at a child's party.

12:15

CAKE and ice cream

12:30

More free play while the adults cleared the cake to prep for opening gifts.  For a kiddos party, it works well to have a designated space for free play in between activities.  I remember when, for a Fancy Nancy party,  I had cleared all the toys out of the playroom (packing them away in closets) to make space for an elaborate dinner table arrangement for the kids.  We had stations for nails, hair, make your own perfume, and necklace making for the girls to rotate through.  Once everyone had finished getting fancy, and had enjoyed eating their petit fours and parfaits, a little girl walked up to me and said "We've had so much fun.  Now all that's left to do is play.  Where are the toys?"  Lesson learned!  Since then, I try to leave some toys out for free play.

12:40

Gifts were opened.  We usually don't open gifts at our parties, but it really does seem to be a hit.  The kids were mesmerized watching each package being opened.

12:50

Favors and goodbyes

What a Fashionably Fun party.  Now to sleep off my cake-induced coma!


Thursday, February 24, 2011

Wednesday, February 16, 2011

Let's talk ICING!

Some days, a girl just needs a some icing, with a cupcake on bottom.

I've been searching for natural ways to dye icing lately.  The ready-made natural dyes have not been effective for making bright/vivid colors, and have changed the consistency of the icing in my experience.  Before buying a new brand and wasting more money, I decided to do a little detective work.

Whenever I need whole food ideas, I always check the Mothering forums.  These moms really know their stuff!

Basically, what I learned is that the best way to dye icing is with...wait for it....REAL FOODS.  Who'da thunk it?

Here are some tips I found:

For GREEN:

From a Mothering.com poster: "Green is easy, though! If you have a health food store, just get a bottle of some liquid chlorophyll and you can mix it right in. Not surprisingly, it gives you a very earthy, leafy green. If you can't find that, spinach leaves work well--you can literally just squeeze the color out of thawing frozen spinach."

This is awesome! I always have spinach on hand- though it's usually fresh. But I think this would work with fresh spinach also...you could simply wash, freeze, and squeeze. Liquid Chlorophyll is thought to boost the immune system, so that seems like a WIN/WIN. Be sure to get unflavored! I see marshmallow wreaths in my future....well, maybe St. Patrick's Day treats would make more sense.

For PURPLE:

Blueberries seem to be the food of choice for making purple. One poster shared: "For the Blueberries, you could cook them in some water on the stove, then strain off some liquid to add to the frosting to color it. Or juice them for a very intense concentrated color to add to the frosting drop by drop."

Another poster suggested using the juice that naturally comes when frozen blueberries defrost. This seems easiest to me and will be what I try first.

For PINK/RED:

A mothering.com poster wrote: "For the beets, just peeling them and slicing will give you red juice, you could juice them and add a few drops at a time, until the intensity is reached. I would think with all the sugar from the frosting, it won't taste too strongly or too bad." Another suggested using the juice from frozen strawberries, much like frozen blueberry juice. I have tried using frozen strawberry puree and it didn't work very well, but the juice is more concentrated with color and may do the trick.

I have also used beet juice to make things pink for my girls (waffles, oatmeal, muffins) and have never noticed that it changed the taste. Another option is beet powder. This was suggested for deep red. I have successfully used a liquid red dye from Whole Foods in the past, and it worked pretty well. However, it took the whole bottle to get a small amount of icing really red. Not exactly economical, at $10 a pop.

For BROWN:

Most of you probably know that cocoa makes delicious brown icing. YUM. Be ready to add a little milk to thin it out, as the cocoa will change the consistency.

For YELLOW:

Saffron and Tumeric seem to be the best options for yellow. From mothering.com: "Depending on your frosting recipe...you could soak the strands of saffron in a tiny bit of water, or milk, depending on your recipe and mix it straight in. The frosting would have a slightly exotic (and expensive) taste, but not overpowering." Another wrote, "Tumeric also works great for yellow, just mix it with water to make a little solution of it first."

For BLUE:

Unfortunately, there seems to be no good way to naturally make blue. Probably because, aside from blueberries, there aren't many foods that are blue. So what's a mom to do if she needs BLUE???

Well, since food dyes are linked to a multitude of yuckiness, I would suggest being creative and avoiding the use of blue dye. Perhaps you could ice the cake with white icing and top with blueberries? Or you could use blue cupcake toppers.

If anyone has any other ideas for blue, I'd love to hear them!

In the meantime, I plan to make some cupcakes and try out these natural dyes. I'll let you know how it goes!