Thursday, September 30, 2010

Make a ONE OF A KIND centerpiece for your next party

My neighbor has started the coolest new biz.  Which, of course, got me to thinking about how I could apply it to my next party.

How cool would this be for a centerpiece?  It could be theme related or say something generic that could be used year to year.  I think the word CELEBRATE would be super fun and would make any food table festive.  And, of course, I love things that can be re-used and enjoyed after the party.

I also think it would be lots of fun to have the guests sign the back.  Several of my friends love unpacking their Christmas ornaments because each one holds a special memory.  This sign could serve the same purpose in helping you remember past celebrations.

Ooohh...a friend recently asked me for some new Thanksgiving tradition ideas....how about a sign by Brit with BE THANKFUL on it?  

Each year, the guests around your table could write the date, their name, and one thing they are thankful for.  I love how my girls' gratitude matures each year.  Last year, Kate was thankful for Mommy's coffee- not because she drinks it, but because Mommy does and it makes her happy.  Too cute!

Tuesday, September 28, 2010

Combine Science and Fun this Halloween!


Looking for ideas to do with your kiddos this Halloween?  Maybe you are the room mother for your child's class and you would like to do something different for the fall party?  Perhaps you are homeschooling and are looking for something fun to do with your pumpkins this year.  Here's an idea I brainstormed with a friend the other day.

Join us for a PUMPKIN PICNIC

We would set this up in stations, so you could have 3-4 kids at each one and rotate them around for an entire group or class.

STATION 1:  Inside a Pumpkin


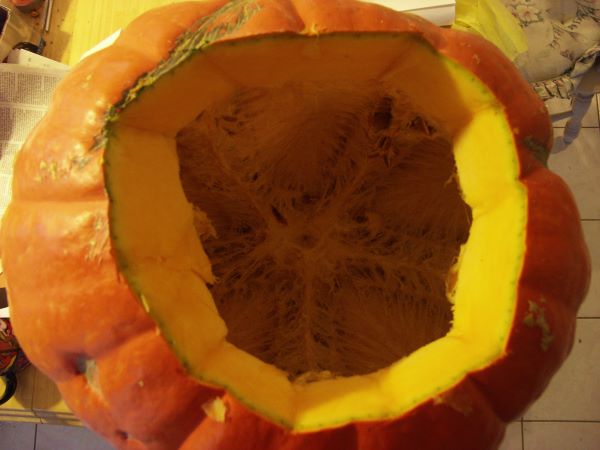
Have a the top cut off a pumkin to show the kiddos what the inside looks like.  Briefly show them how you would clean it out, by pulling out the stringy goop (yes, that's the scientific term) and seeds.  Let the kids handle the slimy mess- why should the grown ups have all the fun??  Show them how you would remove the seeds from the sticky mess.  

STATION 2:  Pumpkin Seed Roasting

Show the kiddos how to season and roast the seeds.  Let them toss the seeds in a little olive oil and salt.  Then, as if by magic, pull out a bowl of already roasted seeds for them to taste.  Here's how to roast the seeds if you need a tutorial.  It calls for butter, which works too.  But for mixing purposes in class, I suggest olive oil over melted butter.

STATION 3:  Pumpkin Flesh

Let the kiddos practice scooping out the flesh of an already baked pumpkin.  Then have them scoop theirs into a small cup and let them sprinkle some cinnamon, pumpkin pie spice, and brown sugar into the cup.  I would put the spices and sugar into salt/sugar dispensers for less mess.  Let them mix and try it.  Explain to them that this is what is used to make pumpkin bread, pumpkin pie, etc.

STATION 4:  Writing about Pumpkins

Have these words written in large letters at this station:
  • pumpkin
  • cleaning
  • seeds
  • roasting
  • flesh
  • baking
Let the students write about and illustrate their favorite pumpkin station.  

STATION 5:  Graphing Pumpkins

Have a bar graph on chart paper with some pumpkin stickers.  Label the bottom of the graph (along the y axis, for you graphy types) with: Cleaning a Pumpkin, Roasting the Seeds, Baked Pumpkin, and Writing about Pumpkins.  Pre-write each child's name (Sharpies work best) on a pumpkin sticker.  Help them locate their sticker and use it to vote on their favorite part of the pumpkin process by placing their sticker above their favorite station name.  

This could be done at home with a group of friends for an easy and educational Halloween project.  It could be done over several days, one station a day, or as one long activity.

Here's a list of supplies you will need (based on a group of 20 kiddos):


  • 3-4 pumpkins with tops cut off (you could "borrow" these from friends or neighbors and return them after the kids have cleaned them out in station 1)
  • 3 cups raw pumpkin seeds
  • small dixie cups (2 for each child, for stations 2 and 3)
  • salt
  • expeller pressed safflower oil or olive oil
  • 3 cups previously roasted pumpkin seeds 
  • 3-4 baked pumpkins 
  • salt/sugar dispenser filled with brown sugar
  • cinnamon, nutmeg, and/or pumpkin pie spice
  • sentence strips with pumpkin words written in big, clear letters (your student's teacher probably has some you can ask to use)
  • pencils and paper for writing stations (or the students could use their science journals)
  • chart paper with a bar graph (again, you could probably get a piece from the teacher)
  • Pumpkin stickers, with student's names pre-written on them 
  • At least 5 adults (one for each station)

Have a great time and don't forget to bring home the extra pumpkin flesh for pumpkin bread!

Friday, September 24, 2010

Grow Your Own Halloween Tree


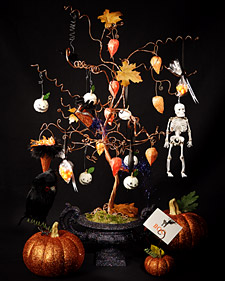
The Halloween tree is sweeping the net again.  And why not?  It's versatile, earthy, cheap, and good, clean FUN!

Here are some recent, and not so recent, takes on it:

Read more about this here
And read about this old school version at this super cool site
Pottery Barn
Martha Stewart's
Martha Stewart: Take Two

My take?  I plan to print out, trim and laminate all the Halloween pics I have from years past and use them to decorate my tree.  Each year I will be able to look at Halloweens past and look forward to the future costume pics.  I'm so cute, I can hardly stand it.

Thursday, September 23, 2010

Teach Your Child the Spirit of Giving


What a great way to help instill the idea of giving back to others.  Basically, you log onto ECHOage and create an Eco friendly invitation for your child's birthday.  They can choose from several options.  Your child is also able to choose a charity they would like to sponsor.

Inside the invitation, it will read:

My ECHOage birthday party is a giving celebration for everyone! Instead of bringing a wrapped and packaged present, we invite you to RSVP and give a secure online gift. Half of your contribution will go toward the purchase of a gift I've been dreaming of, and the other half will go toward the charity I have chosen…


This is an amazing idea.  It is quick, easy, and almost effortless for the host and guests.  Your child will feel the spirit of giving, AND be able to choose their own special gift- reducing clutter and unwanted gifts.

Read more about the idea at Whole Living.

LOVE it!  Thanks for sharing, Julie!

Wednesday, September 22, 2010

Get Your Plan On! Make a party inspiration board


I can't believe I am just now stumbling onto party inspiration boards!  I found this one on birthday girl's blog.

I have life inspiration boards, wardrobe boards, why not ones for parties- a.k.a. my obsession?  

I love the idea of creating an inspiration board for upcoming parties for several reasons:

1.  Lots of my ideas come from the internet.  I am constantly linking photos or ideas and would love to have one place to drag and drop my favorites.

2. I currently keep my ideas in a party sketch book, but it's bulky and not practical to carry around with me.  I could easily keep a photo with me at all times for when inspiration strikes...or when I find a killer deal!

3. I am totally a visual person, but my sketching skills leave something to be desired.  This would be a much easier way for me to explain to people (namely, my sis) what I want them to create.  

So now all I have to do is figure out the easiest way to make one of these photo collages.  I've done it tons of times on sites like shutterfly.com, but I'd like to be able to make my own.  Off to stalk my tech gurus for the answer...

What about you?  Could an inspiration board for your next party spark your creativity?

Tuesday, September 21, 2010

Have you decided how you will celebrate Halloween yet?

How cute are these labels???

I hope you have decided to succumb to the fun that is HALLOWEEN!  I mentioned it here, but I will recap for those who weren't listening- you should have a Halloween bash of some type!  

First, I love, love, love FALL.  Aaahhh....I can breathe again.  I can go outside without melting.  I CAN WEAR MY BOOTS!!!

And second, to me, Halloween is the beginning of fall.  Here in Texas, it's still HOT.  But it's getting cooler.  And by Halloween, it will be almost bearable.  So I bide my time and distract myself with Halloween preparations.

This year, I am having a kiddie carnival like I have for the past several years.  We have little games, a potluck, photo op stations, and tons of fun.

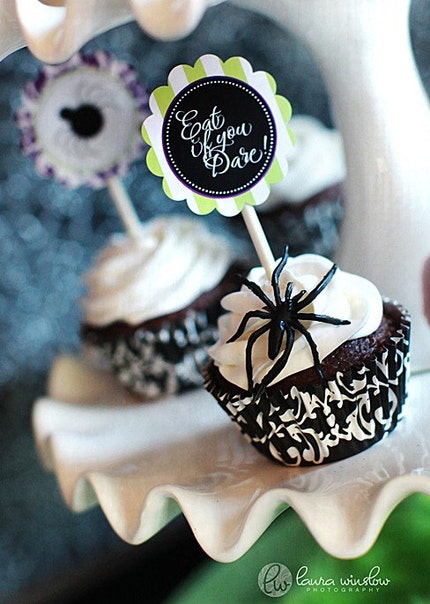
But after seeing Kim's new Halloween Glam collection, I am thinking I need to have at least one more.  I am loving all her labels and catch phrases.  Check out these cupcakes:


She has her printable collection on sale at 50% off until September 22nd.  Usually I like to make my own, but for $9.50, these are a steal.

These are super fun and could be used in so many ways to celebrate Halloween.  I'm thinking a Halloween bunco, wine and whine playdate, or a  Couples Happy Hour at home....what to do, what to do...

I want to know- how are you going to celebrate??

Monday, September 20, 2010

LEGO STAR WARS Party Ideas


Legos and Star Wars.  What else could a first grade boy want for his birthday??

I am totally living vicariously here, since I don't have little boys.  Legos are super cool.  Period.  Legos I get.  But I must admit, I have not understood little boys' fascination with Star Wars until I started looking online for party ideas.  I mean, Star Wars has a lot to offer kids.  Good vs Evil.  Other planets.  Awesome space age technology- complete with ridiculously powerful ships and droids.  I totally want a droid to follow me around.


LIGHT SABERS!!!!!  Enough said.

So, let's stick with light sabers for a sec.  In my opinion, no Star Wars party can be complete without light sabers.  This is a perfect favor idea, and it also doubles as entertainment during the party.  And look at these, made with pool noodles (which are probably on clearance right now!):

I got this pic from Aimee Austin Deisgns.  She has some great ideas one there.  She also sells the invites, so if invitation creations are not your thing, you should check her site out.

Speaking of invitations, I do like to make my own.  If I were going to make these, I would probably head to Hobby Lobby or Michael's and pick up some of this lego scrapbook paper.  I would use that for a mat around the actual invitation.  If you have Star Wars Lego pieces, I think it would be super fun to have your little one design a scene for you to snap a picture of and use for the border or the top of the invite.  I think this would be a great way to give your child ownership.  If that's too time consuming, you could just find an unlicensed photo online by searching "Star Wars Lego" images.  You can easily make this in MS Word.  Just paste the picture at the top.  If you want a starry background, similar to Aimee Austin's, you could print the invite onto black starry paper, but be sure to use white lettering.

**One benefit of giving yourself several weeks to work on the invitations, other than the obvious time management plus, is that you can wait for Hobby Lobby to put their scrapbook paper on half price- which seems to happen every few weeks.

On to the cake....I love serving cupcakes because you don't have to take time to cut the cake, no extra plates and forks are needed, and they are easy to make ahead of time and freeze.  You can also spread them out on a table to maximize their use as decor, similar to the penguin scene we did here:


I would probably ice the cupcakes in primary colors (preferably using natural dyes).  You could use Lego candies to top them and intersperse them on a table with Star Wars Lego figures to create a fun scene.  In the picture below, we used a white tablecloth with small boxes underneath in some spots to provide depth.  For Legos, I would probably use a red tablecloth or black.  If you don't have one, I would send an email to friends before buying one.

For favors, I like the light sabers mentioned above.  But if you also like to hand the kids something as they walk out the door, you could easily fill a baggie with a handful or two of bulk Lego pieces with a printed label that says, "May the Force Be With You.  Thanks for sharing Ryan's 7th birthday with him!"  If you decide to do a pinata, you could fill it with the bulk Lego pieces and some candy.

Entertainment for this party is simple enough.  I would use those bulk Lego pieces and put them on a building table.  You can throw your kid's Legos there, too, as they will all stay with you when the kids leave.  The light sabers above will also keep the kids having fun.

For decor, you could cover the walls of the party room with black bulletin board paper, similar to the graffiti wall I mentioned in a previous post.  If you have a disco ball, or can borrow one, and some strobe lights, you could make the room dark (the black paper with help with that) to lend itself to the inter-galactic world feel.  Glow in the dark stars would make this effect even cooler, and could be bought in bulk and used in favor bags or the pinata also.  A soundtrack would be great as background music for the party.  Again, I would think about borrowing the music from the library or a friend if possible.

Have I left anything out?  If you have any ideas for Star Wars Lego parties, please share them here!

Thursday, September 16, 2010

Send a save the date for your Halloween shin dig!


Check out this cool site for FREE invitations and save the dates...think "evites on crack."  You can email them from the site, which is the fastest and greenest way, IMO.  Or, you can create your save the date and save it to your desktop to either print and mail or email from your email account.

Wednesday, September 15, 2010

The PERFECT icing recipe


Mmmm....icing.  Corner piece, anyone?

I grew up on good old fashioned, crisco ladened, buttercream icing.  For me, it must be buttercream.  Not royal.  Not cream cheese.  Buttercream.  And lots of it.

However...since I have given up shortening (for reasons, see my rant on trans fats in this post), I have had to tweak the Wilton recipe I grew to love.

So...after many, many bowls of icing...and many failed (well, I mean we still ate it) attempts, my sister and I have perfected the buttercream recipe.  The key ingredient?  You guessed it- more butter!

Here's what we do:

2 sticks of butter (softened)
5-6 cups of powdered sugar
1 t. vanilla (or almond extract, depending on your taste)
1/4 c milk

Cream the butter.  Add the sugar, 1/2 cup or so at a time, alternating with the milk.  If you are feeling really decadent, you can use cream instead of milk.

If the icing is too stiff, add more milk.  Too thin, add more sugar.  I have found that it really depends on the humidity outside.  Sometimes only 4.5 cups works, but most of the time I use 5 cups of sugar.  The key is to keep it soft enough that you can spread it, while stiff enough that it will keep it's shape when piping icing into stars or other shapes.  I usually opt for thicker and then dip my spreader or icing tip into warm water to make it easier to work with.

That's all there is to it.  YUM.

Note:  You can use Spectrum Shortening, but I find that the taste is not as good.  It does hold it's shape really well, though.  I have also used coconut oil, but again I prefer the taste of good old fashioned butter.

Now for food coloring.  After happening upon this book in the library on food allergies and behavior problems by accident, curiosity got the better of me and I decided to try out the suggested elimination diet and allergy test with my girls.  I was amazed at the results.  The two main culprits affecting their behavior: sugar and red dye.  It was really eye opening.  My kiddos don't really have behavior problems, but after seeing the affects of sugar and dyes, I became more vigilant about minimizing both in our diet.

Well, I'm no Grinch.

Actually, I did go through a phase of making very healthy, very yucky cakes with too little sugar- sorry Julie!- before finding my happy place with sugar for special occasions and these natural dyes.  I really like them, and they work well for pastel colors.

The India Tree dyes don't make a blue enough icing for Julie's boys' Thomas trains, but I have found this natural coloring kit that is supposed to make a spectacular blue.  I plan to buy this pack next.

Happy icing!

Tuesday, September 14, 2010

The PERFECT birthday cake recipe


Ask and you shall receive, right?

A couple of months ago, I posted on fb that I was looking for the perfect birthday cake recipe.  Now, mind you, I already have lots of yummy, time consuming, from scratch recipes.

But I was looking for something foolproof.  Something I could recommend to a friend that usually uses boxed cake mixes.  Something that doesn't require beating egg whites to stiff peaks, but not too stiff, and folding them evenly into the matter.  Um...I do not have that kind of attention span.  It's all I can do to make sure I put 4 eggs in and not 3 or 5.  Seriously.

Here I will interrupt your regularly scheduled programming for a public health announcement.

What's wrong with cake mixes, you ask?

You would have to be living under a rock to be new to the health risks associated with hydrogenated oils, which are hidden, or right out in the open, in most boxed cake mixes.  But if you want a refresher, or just more resolve to make the switch, take a look at these reports:

Mayo Clinic weighs in on trans fats

Down with the basics and trans fats

I'm not worried about a little extra fat around the belly.  And I'm not talking about skipping ice cream so you can fit into that dress for the wedding.  I'm talking about heart problems.  Diabetes.  I'm worried about the health of my kids.  So, to me, trans fats are serious and not worth bothering with.  Yes, I know, everything in moderation.  But I feel like my family gets their moderate share of trans fats every time we eat out (yum!).  I choose to keep my house free of any trans fatty acids, so that I can relax during the times I can't control our diet- ie. every time we eat outside our own house.

I will now resume regular programming.


So..I need a whole foods based basic cake recipe that is easy enough to memorize, foolproof in that it tells me exactly what to do and when, and comes out perfectly every time.

A family friend, Andrea (who I hope will come and guest blog for us, as she is a wonderful chef), sent me the King Arthur recipe below:


Ingredients  

Directions

Preheat the oven to 350°F. Lightly grease and flour your choice of pan(s): one 9" x 13" pan, two 9" round cake pans, three 8" round pans, or the wells of two muffin tins (24 muffin cups). You can also line the muffin tins with papers, and spray the insides of the papers.
1) In a large mixing bowl, whisk together the sugar, flour, baking powder, and salt.
2) Add the butter and beat with an electric mixer at low speed, until the mixture looks sandy.
3) Combine the milk and vanilla and add, all at once. Mix at low speed for 30 seconds, then increase the speed to medium and beat for 30 seconds.
4) Scrape the bottom and sides of the mixing bowl.
5) With the mixer running at low speed, add 1 egg. Increase the speed to medium and beat for 30 seconds.
6) Repeat this procedure with the second egg. Continue adding the eggs, scraping after each addition, until all 4 are added.
7) After the last egg is added, scrape the bowl once more, then beat at medium-high speed for 30 more seconds.
8) Transfer the batter to the pans of your choice. For layers, divide the batter among the pans. Smooth out the tops with an offset spatula or the back of a tablespoon.

For cupcakes, scoop by heaping 1/4-cupfuls into the prepared muffin tins.
9) Bake for 40 minutes for a 9" x 13" pan; 27 minutes for 9" layers; 24 minutes for 8" layers, or 23 to 25 minutes for cupcakes.
10. The cake is done when it's golden brown around the edges and just beginning to pull away from the edge of the pan. A toothpick inserted in the center will come out clean.
11) Remove the cake from the oven and place it on a rack to cool before removing it from the pan.

Recipe summary

Hands-on time:
15 mins. to 55 mins.
Baking time:
23 mins. to 40 mins.
Total time:
38 mins.
Yield:
one 9" x 13" cake, 24 cupcakes, two 9" round layers, or three 8" round layers
Rate recipe
****+
Recipe comments (105) »

Tips from our bakers

  • The butter in this recipe needs to be very soft. You can soften butter by placing the sticks, still in their wrappers, in a bowl of warm (not hot) water for 10 minutes. If you can leave a dent in the butter with a gentle touch, it's ready to use.
  • To warm the milk before adding it, heat it in the microwave for 1 minute. Add the vanilla after the milk is warm, then add all of the liquid to the recipe at once.
  • Never frost a cake until it's completely cool. For tips on frosting a cake, go to our cake decorating class.
  • This batter weighs 3 pounds; if you're using a scale to measure out your layers, each 9-inch layer should weigh 1 1/2 pounds; each 8-inch layer needs 12 ounces of batter.

Bookmark/share 
this recipe

Del.icio.us Yahoo Digg reddit Google Squidoo StumbleUpon Yahoo
Nutrition Facts
Serving Size 1 piece (57g) 
Servings Per Batch 24
Amount Per Serving
Calories 190Calories from Fat 24
Daily Value*
Total Fat6g
Saturated Fat4g
Trans Fat0g
Cholesterol35mg
Sodium150mg
Total Carbohydrate30g
Dietary Fiber0g
Sugars18g
Protein3g
* The nutrition information provided for each recipe is determined by the ESHA Genesis R&D software program. Substituting any ingredients may change the posted nutrition information.

If this looks complicated, trust me, it's not.  I made 3 last night after a full day at the office.

This recipe is wonderful.  It is so easy, even I can do it in my last minute party prep frenzy.  (I tend to get a bit spastic as the party clock ticks down, which is why I plan ahead.)

To make this cake even better, Andrea suggests using a reduction sauce.  Here's how it's done- it's easier than it sounds, I promise:

All you need to do is put your sauce ingredients (Andrea suggests using 3 oranges, 2 t. sugar, and 1t. vanilla) in a sauce pan, bringing it to a boil, and letting the sauce reduce down by 1/3 over low heat.  Poke holes into the cake and drizzle the reduction sauce over the cake while it's cooling.  If you don't have oranges, you can use orange juice, or search the internet for a reduction sauce using ingredients you have on hand.

Why do this extra step, you ask?  Well, the beauty of those boxed cake mixes is that they have a long shelf life, which translates into a  long counter life once they are baked.  But made from scratch cakes can dry out quickly.  When making a birthday cake, which is often made a few days before the party, it is helpful to use a reduction sauce to keep the cake moist.

Once the cake cools, I wrap it up and freeze it until I am ready to frost it.  Stay tuned for the perfect icing recipe, along with natural icing dyes, later this week.

The reason I don't use the organic cake mixes is because they tend to dry out quickly.  My next step will be to try an organic cake mix with a reduction sauce.  I'll let you know how it goes.  For now, I am really happy with this recipe and I already have it memorized!

Anyone else have a whole foods cake recipe they love?